.png)
Top Text Menus
The top text menus give additional options for adding and deleting design briefs, selecting a design brief and outputting the design calculations and reinforcement for the pile caps.
The file menu provides an option to create a zip file containing the pad design file, to enable the file to be emailed to [email protected]. You can also exit the Pile Cap module to take you back to the MasterFrame model.
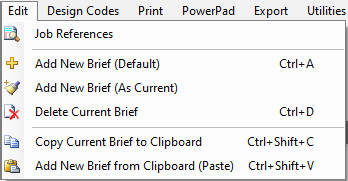
The Edit menu provides options to manage design briefs, such as adding, copying or deleting the briefs within the current design file. There is also an option for editing the Job References, for use with printing.
.png)
The Design Codes menu allows for the setting of the design code to be used for the pile cap design briefs within the file. This is an alternative method of setting the code, in addition to the setting within the Briefs and Pile Head Dimensions tab. This option, in changing the design code, changes the load factors, and the final design should be re-checked after re-running the analysis in MasterFrame.
.png)
The print menu allows the design outputs to be printed to either a printer or as a pdf. There is also an option to define the Job and Project references, which is also included in the Edit menu.
Selecting either print option will open the following popup menu -
.png)
The printer or pdf writer can be selected using the Printer drop down. To print, select the ![]() icon.
icon.
If the print to pdf option is selected, clicking on ![]() creates an open print session – this is noted at the bottom of the screen, as indicated below –
creates an open print session – this is noted at the bottom of the screen, as indicated below –
.png)
An open pdf session allows other design outputs to be added to a pdf file, for example when compiling design calculations for a project. To create the pdf file, expand the drop down to give the following submenu –
.png)
Selecting the Close PDF session will open the Save Print Output As menu, where the file location and file name for the pdf file can be input.
.png)
The PowerPad menu allows for either the current design brief, or all design briefs in the current file, to be exported to Word. This requires the Office Tools module.
Export
.png)
The pile cap RC details can be exported to a printer or as a DXF or DWG drawing file to an appropriate CAD package. The associated bar bending schedule can also be printed off.
Export to Printer/PDF
.png)
Highlight the members to print in the list of members.
Set the first bar mark value.
Show free leg dimensions in the schedule.
Select scheduling code to be used.
Give each main bar a unique bar mark.
Use a unique set of bar marks for each member run.
Print to printer - opens up another print box where you can fill in title details and select your printer or PDF writer.
DXF/DWG
.png)
In addition to the options already mentioned above for the Export to Printer box, you can:-
Load AutoCAD automatically on export - note that the first time you do this it will ask you where to find the AutoCAD application file on your computer. This will be saved for future reference.
Select whether to export in DXF or DWG format along with the AutoCAD version.
Browse to the appropriate folder in which to save it.
Export DXF/DWG.
Schedule
.png)
After making your selections, click on the Schedule button to create a bar bending schedule for the pile caps.
For further details on manipulating the bar bending schedule see MasterRC Bar Scheduler.
Utilities
.png)
Access the use of a screen calculator, if required.
.png)
The defaults drop down provides options to define the set up of the design brief when adding a new brief. A new brief can be added with the default program settings, or by setting the current design brief as the basis for the default.
.png)
The Help menu gives access to the Learning Centre resources. The software manual can also be accessed by selecting the Help:Contents menu item.